


When you're starting or running a small online shop, there’s a whole bunch of things to consider. You know, stuff like marketing strategies, pricing, customer service, and yes, packaging.
However, packaging isn't just about wrapping something up and shipping it out. It's a powerful form of communication that can tell your brand story. And a crucial part of this story lies in the graphics you use.
Raster or vector — ever come across these terms before?
In packaging design, choose raster graphics for detailed, colorful designs, but be cautious about scaling them up. Opt for vector graphics for scalability and ease of editing, particularly for logos and clean designs. The choice depends on your design complexity and scalability needs, with raster offering detailed visuals and vector ensuring clarity at all sizes.
These are two different kinds of digital graphics, and understanding them can make a huge difference in the quality of your packaging design. In this article, we will explore the world of raster and vector images, and find out which one suits your packaging needs the best!
What is Raster Graphics?
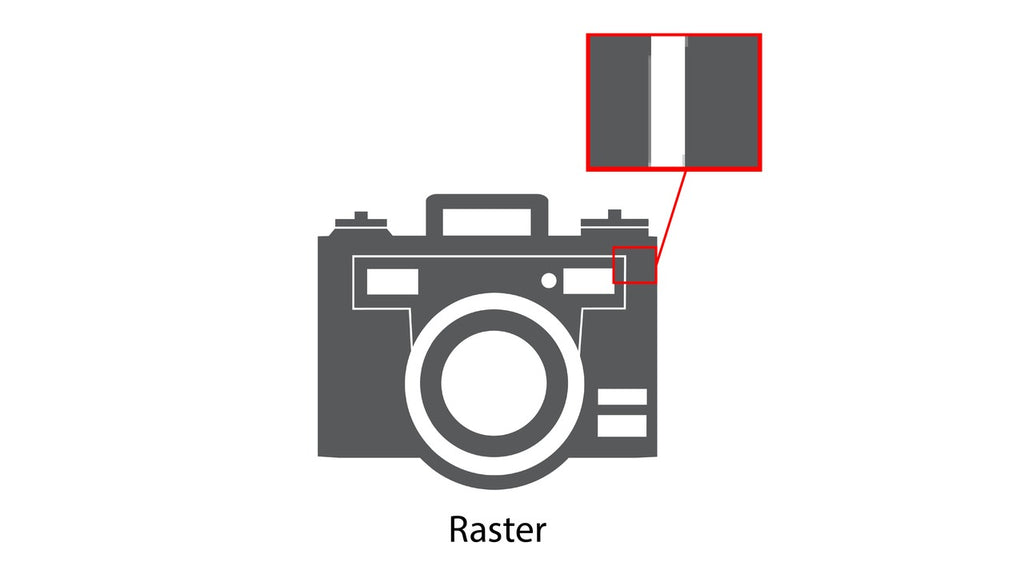
When we talk about raster graphics, we're referring to images made up of tiny squares, or 'pixels'. Think of that beautiful beach photo you took on your last vacation. Now, zoom in. You'll see it's actually a mosaic of teeny-tiny colored squares.
Raster images excel in detail and color depth, which give your pictures stunning realism. They're most commonly used in photographs and digital artwork.
You may be more familiar with raster graphics than you think. Some of the most common raster formats include JPEGs (like those pictures you take with your phone), GIFs (those funny animations you share with friends), and PNGs (perfect for images with transparent backgrounds).
So, why would you use raster graphics for your packaging?
Well, they are fantastic with displaying a degree of detail and color variation that is very hard to achieve with other formats. They can help create a natural and authentic feel, particularly if you're using photography or intricate designs.This makes them perfect for packaging designs that incorporate detailed photos or complex shading and gradients.
For example, if you are selling handmade pouches and you want to show the intricate details and textures in your packaging design, raster images are the way to go.
However, there's a catch. Ever try to enlarge a picture and it ends up looking blurry? That's because when you stretch a raster image, you're stretching those pixels. The image then loses its quality, resulting in a fuzzy or distorted picture.
That is why keeping the size trick in mind is essential. If you're choosing raster graphics for your packaging, make sure your image has a high resolution (or lots of pixels). This way, it can be scaled up for larger packages or promotional materials without losing too much quality. But, the higher the resolution is, the larger the file size will be, so be sure to strike a balance.
In the end, raster is a great choice if your design is complex and detailed, and doesn't need to be significantly enlarged. It brings life, color, and realism to your packaging, giving you the opportunity to stand out on the shelf and make a lasting impression.
What is Vector Graphics?

Vector images are created using mathematical formulas that define shapes, lines, and curves. Think of your business logo. You want that to look just as crisp on a business card as it does on a billboard, right?
That's where vector graphics shine. You can scale them up and down all you like, and they'll never lose clarity or quality. They'll never get pixelated or blurry.
Vector graphics usually come in formats like EPS, AI (Adobe Illustrator), and SVG. These are typically used for logos, icons, and other types of simplistic or flat designs. They're great for packaging designs that require a high level of precision and sharpness.
But vector graphics might not be the best choice for more complex, multi-colored designs or photos. Because of the way they're created, they can sometimes lack the depth and detail that raster graphics offer.
So if you're looking for a scalable, flexible design that retains its sharpness no matter the size, vector is your friend. Take note that clear and sharp packaging design not only looks professional but also communicates reliability and trustworthiness to your customers.
The Difference Between The Two
Scalability and Resolution
One of the biggest differences between raster and vector graphics comes down to scalability and resolution.
For raster graphics, the term 'resolution' is key. The more you have in your image (aka the higher the resolution), the better the detail and quality. But as you enlarge a raster image, the pixels get stretched and your image starts to lose its original detail and can become blurry.
Raster images aren't so great in terms of scalability. If you're planning to use the same design on different sizes of packaging, or if you want to use your packaging designs for large promotional posters or banners, raster could prove problematic, unless you start with a very high-resolution image.
On the other hand, scalability is where vector graphics really come into their own. Because they are based on mathematical formulas, they can be scaled up or down infinitely without losing any quality or clarity. This means your packaging design will look just as sharp and professional on a large box as it does on a smaller one.
Resolution isn't a concern with vector images because they're not made up of pixels. The design remains crisp and clear no matter how big or small it becomes. This makes vector graphics a fantastic choice for logos or other designs that need to be used in various sizes across different platforms.
So in terms of scalability and resolution, the winner is clear: vector graphics take the cake. But keep in mind, the choice between raster and vector will also greatly depend on the complexity and color requirements of your desig
The key here is to know your needs, understand the strengths and weaknesses of both raster and vector graphics, and make an informed decision that best suits your brand and your products.
Editing and Flexibility
Beyond just scalability and resolution, the way you can edit and manipulate raster and vector graphics also plays a crucial role in choosing the right images for your packaging. Let's take a look:
Editing raster graphics allows for a lot of flexibility in terms of color and detail. However, making major changes can be a challenge.
For instance, if you wanted to change the color of an object in a raster image, you'd have to manipulate each pixel individually, which can be a time-consuming process. And forget about changing the shape of an object — that’s nearly impossible without causing distortion or loss of quality.
On the flip side, when it comes to adding effects like shadows or gradients, raster graphics are really a playground for designers, which allows for a high level of detail and realism.
Vector graphics are rather easy to edit. You can easily change the shape, size, and color of any part of the image without losing any quality. This kind of flexibility makes vector graphics great for packaging designs that may require frequent updates or customization.
However, vector graphics are not the best for adding complex effects like gradients or shadows. They are more suited for solid colors and clear lines.
In terms of flexibility and editing, the choice between vector and raster images largely depends on your needs. If you need easy-to-modify, scalable images with clear lines and solid colors, then vector graphics are your answer. But if your design requires intricate detail, complex effects, or specific color variations — raster graphics might be an ideal option.
File Size and Compatibility
Raster graphics, especially high-resolution ones, can make for large file sizes. This could potentially slow down your design software, take up a lot of storage space, and make file transfers more time-consuming. Something to bear in mind if you're working with a lot of designs or large images.
In terms of compatibility, raster images are pretty much universal. JPEGs, PNGs, and GIFs can be opened and viewed on almost any device without the need for special software.
On the other hand, vector graphics are typically smaller in file size, irrespective of the physical size of the image. This is a big advantage, especially if you're handling many different designs for different products.
However, when it comes to compatibility, vector graphics might need a little extra attention. They usually come in formats like EPS, AI, or SVG, which require special software (like Adobe Illustrator) to open and edit. But once you've created your design, you can export it to a more commonly-used format like a PDF or a JPEG.
So, if you’re tight on storage or need to frequently share files, vector could be your best bet. But beware of the software requirements for editing these files. Raster, on the other hand, wins in terms of compatibility and ease-of-access but can take a toll on your storage and file transfer times.
Just like all the other factors we discussed, it's all about weighing the pros and cons and choosing what works best for your specific needs. After all, the goal is to deliver an awesome, eco-friendly package to your customer that tells your brand's story.
Printing Considerations
When printing your packaging designs, both raster and vector graphics have unique considerations to consider.
As discussed, high-resolution is the name of the game with raster graphics. Your designs need to have enough pixels per inch (PPI) to ensure they print clearly and crisply. For most printing jobs, a resolution of 300 PPI is considered standard.
But remember, higher resolution also means larger file sizes. And here's another thing: color. Make sure your raster designs are in CMYK color mode, as it's the most widely used color system in printing. Raster graphics are suitable for packaging designs intended for digital printing or photographic reproduction.
Vector graphics, on the other hand, come with a lot less hassle and offer a smoother printing experience. There is no need to worry about resolution or PPI here. Because vectors use mathematical equations, your designs will print crisply at any size.
However, you will need to convert your vector designs to a format compatible with your printer, such as PDF. And just like raster images, your designs should be in CMYK color mode for printing. Vector graphics are preferred for designs intended for print production, such as offset printing or large-scale printing, as they ensure sharp and precise output.
In essence, both raster and vector graphics can deliver high-quality prints, but vectors tend to offer an easier route with less need to worry about resolution and scalability. Again, the choice all comes down to the nature of your design and your specific needs. The ultimate goal? Delivering high-quality, eco-friendly packaging that makes your products shine!
Final Thoughts on Raster vs. Vector
Both raster and vector have their strengths and weaknesses. Raster graphics are your go-to for intricate, detailed designs, while vector graphics are unbeatable for scalability and ease of editing.
When considering their drawbacks, you will need to watch out when you're resizing raster graphics to avoid any bumps along the way. On the other hand, vector graphics might need some extra attention in the compatibility department, especially when it's time to hit the print button.
Before you dive headlong into the packaging design world, it's worth considering your approach. What does your product represent? Are you leaning towards intricate designs or aiming for a crisp and sleek look? Keep your printer's preferences in mind too — after all, you want your creation to shine in all its glory.
Your packaging is a powerful way to communicate with your customers and make your brand memorable. So whether you choose raster or vector, make sure your designs represent who you are and what your product stands for.
For more business tips and tricks, click here.


